DHR/AR Rheometer: Operating the UV Curing Accessory
Overview
Rheological monitoring of curing is usually conducted using oscillatory (dynamic) rheology. The curing process is very rapid and, to capture it fully, fast oscillation is used. The sampling rate for this mode is twice the fundamental oscillation frequency, up to 25 Hz. So, at a fundamental frequency of 25 Hz the sample rate will be 50 points/sec, but at 30 Hz it will be 30 points/sec. The timing and irradiance of the light is set from an EVENT step in the experimental procedure.
A typical experiment consists of:
- Conditioning step
- Event step
- Oscillation: Fast Sampling step
- Post-experiment step
Setting Up a UV Curing Experiment
Follow the instructions below to set up a UV Curing experiment.
- Access Conditioning > Options experiment setup and configure the fields as shown below. This represents a typical configuration for UV Curing experiments.
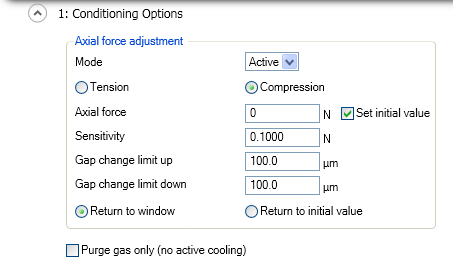
- Add the Conditioning step to the experiment.
- Next, select Other > Event experiment setup and check Event enabled.
- Select Event 1 and Synchronize to next set command. This will set the event timer to run from the beginning of the subsequent step (in this case, the time sweep), rather than the beginning of the event step itself, for which Immediate should be selected.
- NOTE: Only Event 1 can be used for irradiance control.
- Enter these settings: Delay time is the time between the event timer being started and the event being triggered. Event duration is the time for which the event is maintained.
- Enter the UV light irradiance in mW.cm-2 in the Irradiation field. This value is obtained during the Irradiance Calibration.
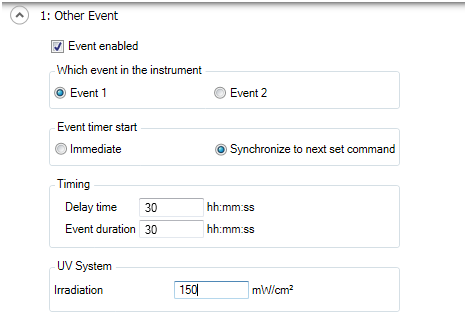
In the example above, the illumination is set to begin 30 seconds after the beginning of the time sweep step, and to be held for 30 seconds at an irradiance of 150 mW.cm-2. When satisfied with the setup, add the Event step to the experiment.
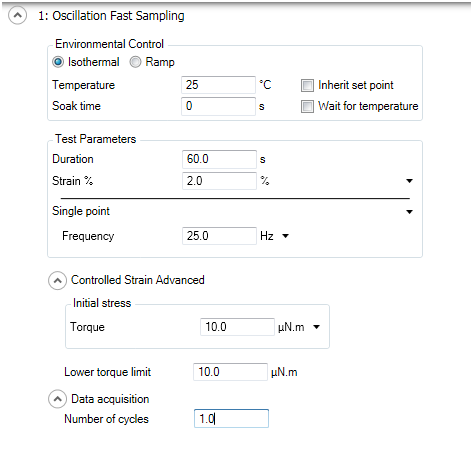
- Create an Oscillation: Fast Sampling step, configure the step as shown below, and add it to the experiment.
- Both the EHP and two-piece cover have connections for purge gas if this is a requirement for the material under test.
- WARNING: DO NOT run the procedure unless the upper fixture cover is in the lowered position or the two-piece cover is in place as seen in the figures below.
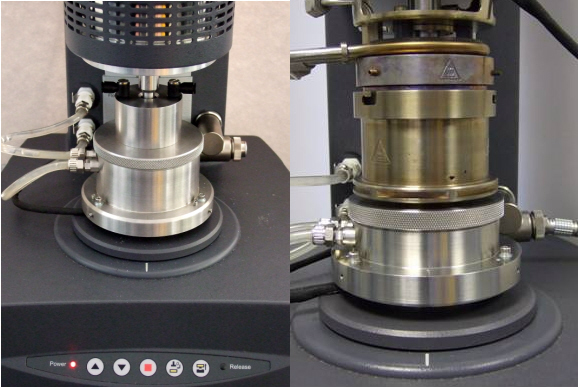
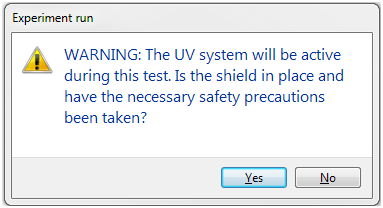
- Once the cover is in place, the procedure can then be run in the usual way. A warning message displays:
Back to top
Completing the Experiment
On completion of the procedure, the irradiance will be set to zero.
- If you are running another sample immediately, and reusable plates have been used, raise the instrument head, clean the plates with an appropriate solvent, and continue as previously.
- If disposable plates have been used, release the caphead screws securing the upper geometry to the holder and raise the instrument head. Unscrew the lower plate retaining ring, replace the upper and lower plates and continue as previously.
- If no further samples are to be run, power down the OmniCure™ unit and isolate from the mains supply.
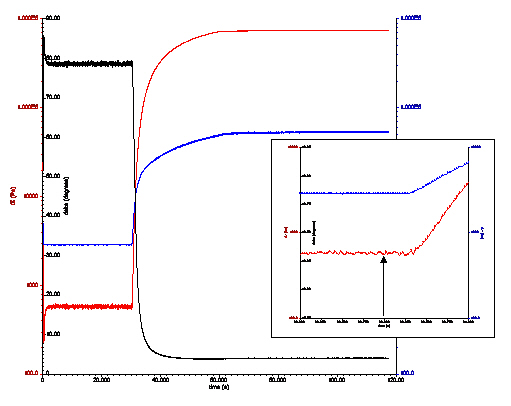
An example of a resulting plot is shown in the figure below.
Back to top
See Also
Introducing the UV Curing Accessories
